Cooking at High Altitude: Amanda’s Green Chili Stew

A few weeks ago Brad and I headed west to spend some time with his family in Colorado and to embark on what has now been deemed our second annual ski trip with Amanda and Alec – Amanda being Brad’s sister and Alec being her best pal, and a good friend of ours as well. Last winter the four of us spent a few days skiing in Tahoe (which was my FIRST time on the slopes) and discovered a wonderful formula: ski, cook, sleep, repeat.

My three companions grew up in Colorado and look natural as hell coming down a black diamond. Me, I took a beginner lesson last year, but have otherwise been initiated as a skiier thanks to their (very patient) teaching, encouragement and occasional forcing of me down a terrifyingly steep run. Despite our varying skill levels, we’ve found that we love hitting the mountain together.

Obligatory photo of Crested Butte

So naturally, a few weeks in advance of our trip, once we’d sorted travel, lodging and gear, the obvious question started to circulate, “what are we going to cook?” Because really we all knew we only had one plan upon returning to the house at the end of each day: dinner together, wine included.
Here’s the menu that eventually took shape:

Day 1: Whole Roasted Chicken, Kale Salad, Root Vegetable Ribbons with Sage Butter

We were ravenous, even though we’d only driven that day, and it was all delicious. Kale salad is old hat and veggie ribbons were a successful trial of this recipe. Alec asked me to show him how to make stock with the leftover carcass. We all fell asleep that night and woke the next morning to the scent of simmering chicken and herbs.

Day 2: Green Chili Stew

Amanda said she’d pretty much perfected her recipe, and it was the best possible use for the stock. We left it to simmer while attending a local Mardi Gras parade and were welcomed by the aroma upon returning. All agreed the stew was tops. It was also confirmed that everything takes longer to cook at high altitude.
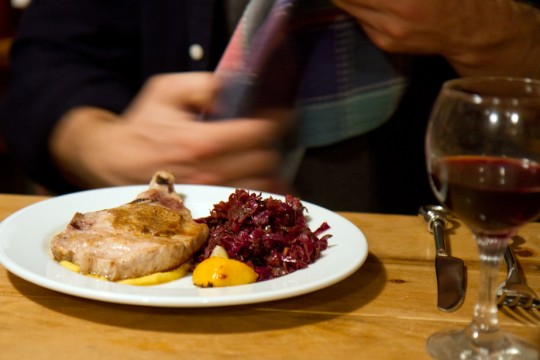
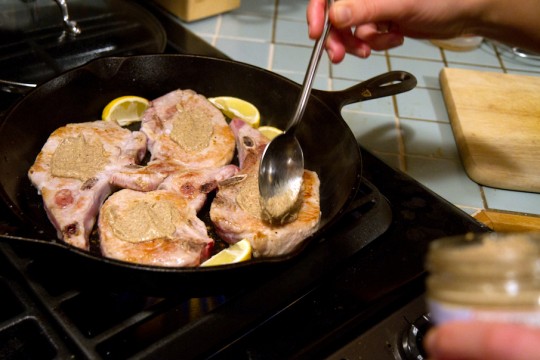
Day 3: Mustard Rubbed Pork Chops, Braised Red Cabbage, Root Vegetable Puree

In a moment of inspiration I simmered the leftover ribbons in the rest of the stock, and the resulting puree had us licking our plates. My recently mastered pan-to-oven pork chop cooking method was demonstrated, and no one could get enough of the bacon-y braised cabbage (a previous hit in all of our home kitchens).

Day 4: Braised Brisket, Roasted Sweet Potatoes and Brussel Sprouts

Braised a day in advance, my winter brisket recipe was a nostalgic redux from the previous year’s trip and voted best dish of the week. Week-long accumulation of bacon fat and a jalepeño that escaped the stew gave Alex a leg up on those roasted veggies. Not a bite of them remained.
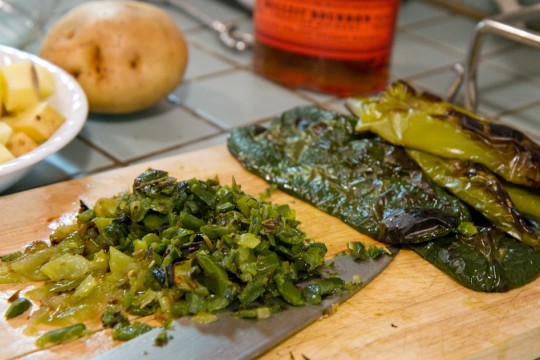
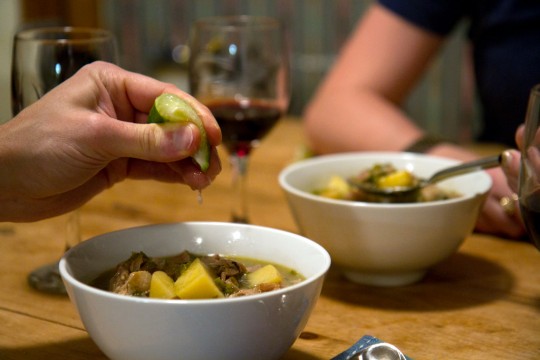
This past weekend I tested Amanda’s Green Chili Stew recipe in my Brooklyn kitchen and I concur, I think she’s nailed it. We both agree it’d be best to make this with the famous New Mexico Hatch green chiles, but having returned to our respective homes far from the Southwest, a mix of Poblanos for depth and Jalepeños for heat with whatever other green chili peppers you can get your hands on will make do without disappointment.

There were 3 men at my table when said test took place, and seconds were ravenously enjoyed. I recommend you serve the stew with some warm corn tortillas for sopping and a few wedges of lime for squeezing. You can thank Amanda when you realize this one will be in your repertoire for some time to come.
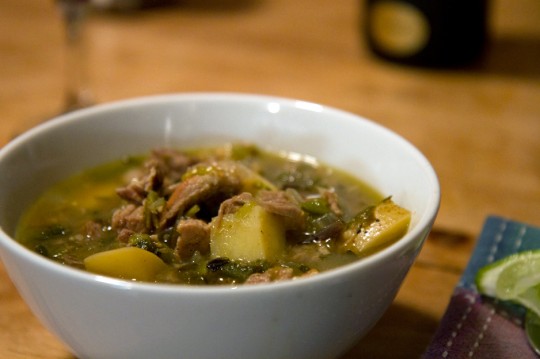
Amanda’s Green Chili Stew

Serves 6-8

  • 2 1/2 – 3 lbs. boneless pork butt, cut into 2″ pieces *you want some fat included in this
  • Neutral oil or bacon fat
  • 4 cups stock *I used some homemade pork stock, but chicken will work just fine
  • 2 lbs. mixed green chili peppers *I used 4 Poblanos, 4 Jalepeños – these are key in the mix – and a few Anaheim and Serrano peppers for good measure
  • 1 lb. tomatillos, peeled and halved
  • 1 large onion, chopped
  • 2 cloves garlic, minced
  • 2 medium potatoes, peeled and cut into 1/2″ pieces
  • Water
  • Salt
  • Corn tortillas for serving *optional

In a dutch oven (at least 5 or 6 quarts) or heavy bottomed stock pot, heat a few tablespoons oil or fat over medium-high heat. In batches, not overcrowding, brown the pork on all sides *be sure to pat it dry first, transferring it to a plate as you brown the next batch. When the last batch is browned, add the stock to the pot, stirring and scrapping the browned bits from the bottom, along with any reserved pork. Bring to a boil and then cover and reduce to a simmer for about 2 hours.

Meanwhile, heat the oven to 350. Place the peppers in a single layer in a shallow roasting pan or rimmed baking sheet. In a second pan or oven proof skillet, place the tomatillos, cut side down. Roast, with the peppers on a lower rack and tomatillos on an upper, for about 30 minutes. Remove the tomatillos and allow to cool, then move the peppers under the broiler for about 5-7 minutes until nice and blackened in spots. Remove the peppers and allow to cool.

In a blender or food processor, puree the tomatillos and set aside. Move the peppers to a cutting board and rub the charred skins off and discard (if you’re sensitive to heat, wear gloves for handling them), remove the stems, and depending on your spice tolerance you may want to remove some or all of the seeds too*, then coarsely chop all of the peppers into roughly 1/2″ pieces. Now, wash your hands before you touch your eyes!

When the pork is ready it should be very tender. Using a fork, pull the pork apart into smaller pieces (you can also remove it to a cutting board with a slotted spoon and coarsely chop it). Transfer the pork and stock to a large bowl and reserve.

Increase the heat on the dutch oven to medium and add a about 2 tablespoons of oil or fat. Add the onions and cook, stirring occasionally until golden brown and soft. Add the potatoes and garlic and stir for a few minutes more. Add the tomatillo puree, chopped chiles, reserved pork and stock. Add a cup or so of water, if necessary, just to cover by about an inch. Bring the whole mixture to a boil and then simmer for another 30-40 minutes until the potatoes are very tender but not falling apart. Taste and season with salt if desired. Serve with warm tortillas and a wedge of lime for squeezing.

*I love me some heat, so after running it by our guests I left the seeds of all the chili peppers in and we all found it to be satisfyingly spicy. If heat isn’t your thing, simply remove the seeds and membranes from all the peppers. To take a safe, middle-of-the-road route, I’d let the Poblanos be, (Anaheims are pretty mild as well) but remove the seeds from the Jalepeños and other hot peppers.

A Salad to Celebrate Citrus Season

For the most part, I’m more or less a locavore by habit, especially when it comes to produce. But Northeast winters are long and one can only eat so many cold storage apples. As February rolls into to March, fresh, local fruit is still a long way off. And so, each Winter I make an exception and turn my taste buds South or West, figuring it’s not the worst thing to support citrus producers in Florida and California. Not to mention a burst of vitamin C does a body good during cold season.

On a more or less daily basis Brad loves a grapefruit with breakfast, and I like a few clementines or a juicy navel orange with my lunch. But lately I’ve been seeing a lot of recipes for citrus, including a citrus granola, and even a citrus brulee. When my pal Alexis was assisting on a photo shoot at Franny’s and sent me a picture reminding me of one of my favorite antipasti, a simple salad of blood oranges, olives, hot pepper and parsley, I decided it was time to shake things up at Chez T.

And so, here is a celebration of citrus season. My own simple salad with a mix of oranges and tangerines, fennel, cilantro, some good olive oil and a touch of Maras chile*. We’re lucky to have access to a most awesome selection of organic citrus at our Park Slope Food Coop – the specimens I chose this time included a Cara Cara red navel orange, a Temple orange, a Mineola tangelo, and a Honey tangerine.

*I picked up the crushed Maras Chile at a fantastic spice shop, Allspice in Des Moines, Iowa. It’s a Turkish chile that is medium-hot, a bit sweet and acidic all at once. I haven’t found anything that doesn’t benefit from a light dusting and it really perked up the citrus salad. You can order from their shop online (pssst! Lizzie, I finally found a spice source for you), so check these guys out.

Citrus and Fennel Salad

Serves 4

  • 4 medium oranges, tangerines, or even grapefruit – mix and match whatever looks good
  • 1 large or 2 small fennel bulbs
  • 2-3 tablespoons good quality olive oil
  • 1 cup of whole cilantro leaves plucked from the stems
  • Sea salt, fresh cracked black pepper
  • Maras chile (or a pinch of cayenne) for garnishing

Thinly slice the fennel bulb (if you have a mandoline, use it) and place them in a bowl. Toss with 2 tablespoons olive oil and salt and pepper to taste. Set aside.

To cut the oranges: Trim both ends off and stand the orange upright on one of the cut sides. Then cut the the rest of the peel off by trimming down along the orange toward the cutting board, working your way around. Cut the orange in half lengthwise, then lay the 2 halves flat on the cutting board, cut side down, and slice them crosswise into 1/4″ thick half moon shaped slices. Save as much of the juice from the cutting board as possible, transferring it to the bowl with the fennel, and discard any seeds.

When the oranges are ready, give the bowl with the fennel and reserved orange juice a good toss. Then gently toss the orange pieces and the cilantro leaves with the fennel. Taste for seasoning and transfer to a serving plate. Garnish with a light drizzle of a bit more olive oil if desired, then garnish with a sprinkling of chile.

Tomatillo Smothered Spinach, Mushroom and Goat Cheese Burritos

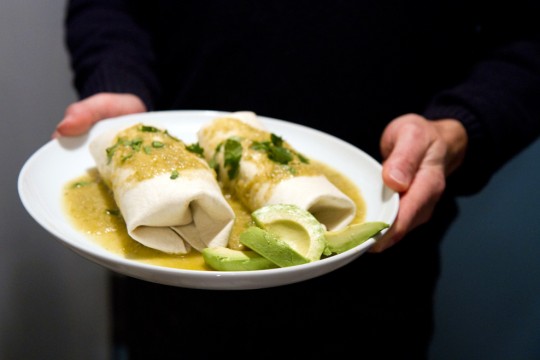
Back in September I shared a recipe for a tomatillo sauce. This is one of my late summer/early fall staples that goes in the freezer until it’s time to brighten up winter. The recipe for the sauce is adapted from Rick Bayless’s Everyday Mexican, which I originally used to make simple spinach and mushroom enchiladas. Eventually, I started making quinoa with pepitas and cilantro, rolling this zesty grain mixture into burritos along with spinach, mushrooms and goat cheese, and smothering them with fresh, spicy tomatillo sauce.

Did you make some tomatillo sauce? If so, it’s time to reach into the freezer and reward your efforts with one of my favorite, not to mention convenient, vegetarian meals. Once you bite into a spicy, smothered burrito, you’ll forget you ever knew such a thing as winter doldrums.

Spinach, Mushroom, Quinoa and Goat Cheese Burritos with Tomatillo Sauce

Makes roughly 4 burritos with some leftovers

  • 1 quart tomatillo sauce
  • 1 cup quinoa
  • 1 cup chopped cilantro leaves
  • 1/2 cup pepitas (roasted pumpkin seeds), coarsely chopped or lightly pulsed in a grinder/processor
  • Juice of 2 limes (just 1 if it’s large and juicy)
  • Olive oil
  • 1 large bunch of spinach, rinsed, stemmed and coarsely chopped
  • 1 lb shitake mushrooms, stems removed and sliced
  • 1 teaspoon cumin seeds, crushed
  • 1-2 cloves garlic, smashed and chopped
  • Salt and fresh ground pepper
  • 4 oz. goat cheese, crumbled
  • Flour tortillas (you can use 10″ burrito size, or you can use smaller tortillas and make 2 mini-burritos per person)
  • Additional cilantro leaves and/or sliced avocado for garnish *optional

Either thaw the tomatillo sauce in the refrigerator a few days in advance, or set it in a bowl of water at room temperature a few hours before dinner. Empty it into a saucepan and set to simmer on a rear burner, stirring occasionally.

Preheat your oven to 350.

Meanwhile, rinse the quinoa and place it in a saucepan with a tight-fitting lid. Add 1 1/2 cups water and a pinch of salt. Bring to a boil and then cover and reduce heat to a simmer for 15 minutes. Remove the saucepan from the heat and allow to rest and steam with the lid on for about 5 minutes more. Add the cilantro, pepitas and lime juice, and gently toss while fluffing the quinoa with a fork.

In a sauté pan, heat roughly 2 tablespoons of oil over a medium heat and add the mushrooms. Toss to coat with the oil and cook, stirring occasionally until golden and tender (about 5-7 minutes). Add the garlic, cumin seeds, salt and pepper, and cook, stirring for about 2 minutes. Add the spinach (it’s OK to let some water cling to the leaves when you rinse it) and toss, cooking for about 3 minutes until it’s wilted and thoroughly combined with the mushrooms.

Lay out your tortillas on a baking sheet. Pile a few spoonfuls of quinoa onto each tortilla (don’t overdo it or you wont be able to roll them without the contents falling out), then distribute the spinach mushroom mixture on top. Finish each with a bit of crumbled goat cheese and roll the burritos. Place them folded side down on the baking sheet in the oven for about 5-6 minutes. They’ll turn a golden color and begin to crisp on the bottom. Move the burritos to plates and smother them with a ladle or 2 of tomatillo sauce. Garish with some chopped cilantro – you can also add a few slices of avocado on the side – and serve.

*Use your judgment on the filling amounts based on the size of your tortillas and the appetites of your guests. We almost always have leftovers, which you should store separately for making future meals.

The quinoa is great as part of a green salad with avocado and a lime vinaigrette. We also like to make a breakfast burritos of eggs scrambled with spinach and mushrooms and smothered in the leftover tomatillo sauce.

Talking About Meat, or Why the World Needs Butchers and Ballerinas

Brad keeps asking me when I’m going to write more about my recent butchery workshop. He thinks those of you who are reading want to know more. But do you? I’ve found over the past few months as I’ve been nurturing an interest in learning to cut up animals, that it’s a tricky subject to discuss. The most common question following my “so I’m going upstate to study butchery for a week” statement was “why would you want to do that?”

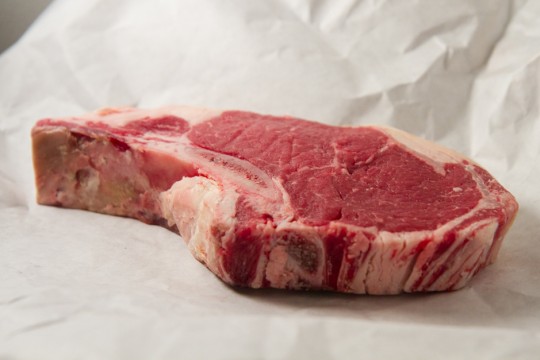
A soon to be perfectly cooked ribeye steak for 2

The thing about butchery is that it is a trade craft. You can’t learn it from a book, you need someone to teach it to you and it needs to be practiced. I grew up training to be a dancer, and dance is a lot like butchery in this sense. It is an art and its works are passed on from one dancer the next.

My friend Clymene, who is a member of the Elisa Monte Dance Company told me that many of the young dancers she meets now aren’t as interested in classic techniques or in joining the companies that perform traditional works. They just want to be on TV, or go on tour with a pop star. I’ve always thought it was a good thing that our culture has popularized dance again with the help of movies like Step Up (yes I’ve seen all 3, several times, and I still crush on Channing Tatum), but it’s important that there is always an up and coming generation of dancers like I once was – dreaming that one day, if you practiced and worked hard enough, you would be taught to dance a part in a piece like Alvin Ailey’s “Revelations” for audiences who want to experience a part of dance history and a work of art.

Are you wondering where I’m going with this? There aren’t a whole lot of butchers around these days. A craft that needs to be passed on doesn’t have many masters left. Seriously, when was the last time you visited a butcher? If the food-loving, thanks to celebrity chefs and the popularization of a “foodie” culture, generation that follows us eats like I hope they do – with concern for where their food comes from, and with a desire to support healthy local economies and the environment in doing so – there will need to be more butchers. We need more people who are trained in the craft of cutting up the animals we eat. And yes, this is what I want to learn to do.

We also need to encourage young people to go to the ballet.

Some cows I met on a very cold day in New Paltz, NY

Maybe you find this talk of animals and butchery as fascinating as I do, but a lot of people who eat meat don’t like to think about eating animals (in fact the folks at Fleisher’s told me that when they carry whole animal carcasses into the shop from the van out front, it’s not uncommon for parents to cover their children’s eyes). But it’s important to know where your food comes from. If you’re eating meat, you’re eating animals, and each and every one of them deserves a healthy life and a humane end. And if you’re going to eat animals, have the respect not to waste them. After all, they died so you could eat and live.

Unfortunately the commercial meat industry has devolved into a terrible cycle that is concerned with producing a supply that meets and demand and makes a profit with little regard for the lives of the animals that become their product. And we Americans eat a hell of a lot of meat. I won’t go into it here, but watch Food Inc. or read a book by Michael Pollan if you want to learn more. However, there are farmers who care for the animals they raise, there are slaughterhouses (yes, that pig had to be killed so its belly could be cut up, cured, smoked and fried for you to eat your bacon) that use humane practices in the handling and killing of animals, and there are butchers who make it their craft to cut up those animals so they can be your food. In the case of Fleisher’s and other sustainable butcher shops, they are dedicated to using the entire animal, flesh, bones, fat and all.

If more people support the individuals and businesses in the meat industry who are doing things right, healthy supply will grow to meet healthy demand. And healthy animals make healthy (and better tasting) food for the people who eat them.

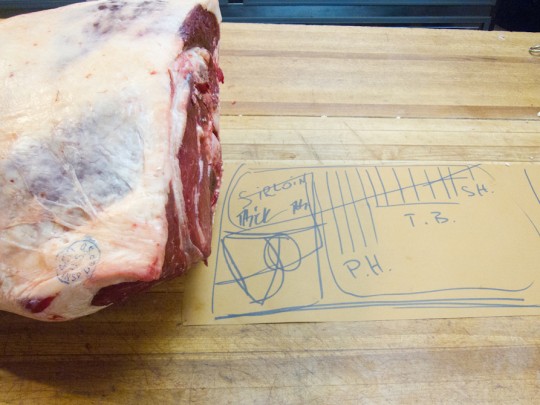
The leg bone connects to the ... wait, where does the porterhouse come from again?

So what did I learn at Meat Camp? Certainly more than I can relay in a blog post. After the first day during which we attended a pig slaughter and watched a demonstration on cutting down a whole side of pork, only four of us remained. In the days that followed we learned about everything from animal husbandry, slaughter, inspection and grading, to properly breaking down whole animals as meat. We got very “hands-on” with several pigs, lambs and chickens, and we watched the pros work on cows. Doing so includes an understanding of anatomy, knife skills, technique and a lot of practice.

I was fortunate to be the student of Hans Sebald, who is considered a Master butcher and is a highly respected former instructor at the CIA (that’s Culinary Institute of America, not a government agency). Hans was an encouraging teacher with more knowledge to share than I could hope to learn in a lifetime. He even took us to Walmart to talk about commercial meat processing, packaging and labels. The comparative tasting of industrial vs. responsibly raised meat that followed back at the shop was eye opening.

I’m currently seeking more opportunities to continue learning, and in the meantime I’m cooking and eating meat as I try new techniques and note recipes. Oh, and I just celebrated a birthday for which I was given this book and a meat grinder. Since then, Brad and I have also been taste testing a whole lot of sausage.

I’ll continue to share my knowledge and experience as I gain it. But first, how about a recipe for duck ragu?

Adventures in Duck Ragu

I’ve made this ragu twice in recent weeks. It’s all part of my efforts to cut up and eat whole animals, and my friend and farmer Ray Bradley has been kind enough to hook me up with some very nice ducks. I reserve the breasts for a meal of their own. The bones go in a bag in the freezer for a future pot of duck stock. Any excess skin gets rendered for a stash of duck fat – Francine gets to eat the crispy skin cracklings that are left behind – and then I use the legs and any other scraps of meat I can get off that bird to make this ragu.

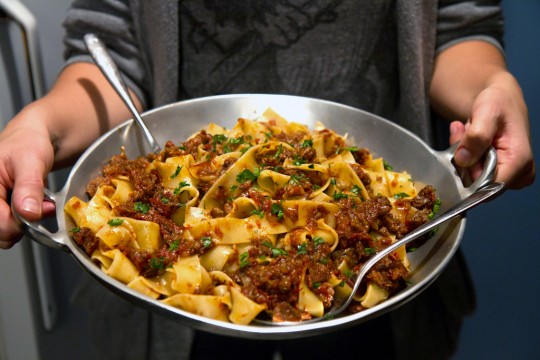
The first time I boned everything (you know, to practice my knife skills) and cut the meat into pieces that cooked down, fell apart and resulted in a chunky kind of rustic ragu (pictured above). The second time I left the legs whole, with skin and bones, which I removed once the legs were tender, shredded the meat, and returned it to the pot. Brad firmly declared that this was his preferred preparation, and so this is the recipe I’ve decided to share.

If you’re ambitious, you get a lot for you money when starting with a whole duck, and you can be sure every part is used. But you could also start with some duck legs that have been cut up for you, and you’ll still end up with some darn tasty ragu.

Pappardelle with Duck Ragu

Serves 4 hungry people

  • About 2 lbs. duck parts, with skin on (legs are ideal, but you can use breasts too)
  • 1/2 cup chopped shallots
  • 2 cloves garlic, smashed and chopped
  • 1 dried chili, crumbled
  • 1 sprig of rosemary
  • 1 cup red wine
  • 1 cup stock (I use duck or turkey, but chicken works too)
  • 2 cups whole, peeled tomatoes, coarsely chopped
  • 1 tablespoon balsamic vinegar
  • Salt and pepper
  • 1 lb. pappardelle (or another long flat pasta, like tagliatelle or fettuccine)
  • Parmigiano-Reggiano cheese
  • Parsley, finely chopped for garnish (optional)

Rinse and generously salt and pepper the duck pieces. Heat a heavy bottom pot over medium-high heat, and brown the duck, skin side down, then turn and continue to brown for a few more minutes. Remove the duck to a plate and drain all but 2 tablespoons of the fat that has accumulated in the pot.

Add the shallots, garlic and chili and stir frequently for a few minutes until the shallots have begun to soften. Add the wine and stir to scrape up the browned bits stuck to the bottom of the pot, then allow it to bubble and reduce for a few minutes. Add the rosemary, stock and tomatoes and bring to a boil. Slide the duck pieces into the liquid (it should just cover the meat), reduce the heat to low, cover and simmer for 1 1/2 – 2 hours until the duck is very tender (if you’re using the legs, the meat will shrink up off the bone). Discard the rosemary sprig.

Bring a pot of salted water to a boil.

Meanwhile, remove the duck to a cutting board and when cool enough to handle, remove the skin and shred the meat, discarding any bones. Return the shredded meat to the pot, add the balsamic vinegar and season with salt and pepper to taste.

Cook the pappardelle, drain and return to its cooking pot (but remove it from the heat). Ladle 2 cups of the ragu and toss with the pasta to evenly coat the noodles. Distribute the pasta into 4 shallow bowls or 1 large serving dish. Spoon the remainder of the ragu over the pasta, grate some cheese over the top and garnish with a bit of parsley. Serve and enjoy!

Breakfast with Brad: Oatmeal with Peanut Butter and Maple Syrup

One of the best things I ever did was marry a man who cooks breakfast.

This is not the first time I’ve sang praise to the Thomason household morning routine – back in June I shared Brad’s recipe for what I like to call “SuperFood Smoothies”. But now that we’re deep in the heart of (an admittedly mild) Brooklyn winter, who wants to be woken up with a cold breakfast? Certainly not this sleepyhead. It’s hard enough to get out from under the warmth of the covers as it is.

A favorite breakfast from Brad’s winter repertoire is peanut butter and maple syrup oatmeal. That’s right, he adds a heaping spoonful peanut butter to guarantee the oatmeal really sticks to your ribs. The result is a creamy bowl of sweet and savory breakfast goodness.

Brad’s note:

Oatmeal is great in the winter. Warms you up, and is a good dose of fiber (which I try to eat more of ever since finding out that I had high cholesterol). The peanut butter adds some smoothness to the texture and some protein, which makes the oatmeal last longer as a meal. Oh, and peanut butter and maple syrup together are delicious.

Oatmeal with Peanut Butter and Maple Syrup

  • 2 cups water
  • 1 cup rolled oats *not the instant or quick cooking kind, and ideally organic
  • 1/2 tsp. salt
  • 2 tbsp. peanut butter *I prefer the natural stuff, creamy, salted, but that’s just me
  • 2 tbsp. maple syrup *Real maple syrup! No Mrs. Butterworth corn syrup crap

Directions:
Bring the water and salt to boil in a saucepan. Add the oats, reduce the heat to low and simmer for 10 minutes. Add the peanut butter and maple syrup and stir. Serves 2.

Guest Post: A Koreatown Primer

I’m not a kimchi virgin. I’ve grown to love NYC’s Koreatown over the past few years. But that doesn’t mean I have much of a clue as to where to go and what to order without the advice of internet foodies who have gone before me. So when my Korean friend invited Brad and I to join him for some Koreatown BBQ, I of course said yes.

I sat back and let him order for the table (in Korean of course), drank the soju he poured, and when he stuffed a lettuce roll full of bulgogi into his mouth like a chipmunk hoarding a nut, I tried my best to do the same. When all signs pointed to party, we eventually followed him to some seedy yet somehow swanky joints on the upper floors of the buildings that line one of the most amazing blocks in midtown Manhattan.

Thanks to my long time friend, Paul Kim (who served as our guide and photographer for an evening), I present to you a guest post on how to chow like a Korean in Koreatown.


Things to keep in mind before going out for a night to Koreatown, NYC or to your local Korean restaurant establishment:

  1. Do not plan on taking a significant other whom you just started dating. The way to really enjoy Korean food is to be glutenous and ravenous. This means a lot of overstuffing your face and quiet long silences due to large amounts of food in your mouth. Not to say that you can’t follow the standards put forth by Emily Post at a Korean restaurant, but I suggest that if you really want to enjoy the complexities of flavors in your mouth that you check that bitch, Emily Post, at the door.
  2. Be ready to smell like smoky delicious garlic and meat throughout your clothes and hair. The newest Korean restaurants have very effective vents that suck most of the smoke from the table top grills to eliminate this lingering aroma of food, but depending on which restaurant you decide to dine at, be prepared.
  3. If you or people in your party are vegetarians I may suggest different alternatives. Korean cuisine has a lot of vegetarian options, but no one goes out for Korean food because they’re vegetarians. If you are vegetarian, know that you will see a lot of raw bloody meat at the table. And all the vegetables dishes will have fish oil in them.
  4.  Don’t chat up the server. These Korean restaurants are really “burn and turn”. You chatting them up to impress them with your knowledge of Old Boy or using the minimal Korean that you learned from your SAT Math tutor is only going to aggravate them. But feel free to raise your hand and even call out to the server to get their attention. This isn’t considered rude, but always use discretion.

Koreatown, NYC evolved on 32nd St and Broadway due to the surrounding neighborhood industries; unlike that of Chinatown or Little Italy where the neighborhoods grew as dual ethnic residential and commercial enclaves. Midtown Manhattan, or more specifically the Garment District, brought in a large influx of Korean immigrants during the late 1970’s and throughout the 1980’s due to the textile industry boom in South Korea during that time. Naturally, these SoKos needed to eat, hence the start of Koreatown on 32nd Street aka Korea Way. It has now grown in size and scope as a destination spot for diners, revelers, and “afterhours” drinkers from multiple ethnicities (ie Koreans and their non-Korean friends) and ages (the younger the better).

I recommended to Heather and Brad that we go to Won-Jo. The place is one of my personal favorites and I’ve been going there for years, but thanks to the likes of David Chang the place had a line out the door overrun by “foodies”. Instead of trying to wait out the line, I recommended that we go to Soot Bul across the street. I didn’t have much experience with this place but, established in 1979, it’s one of the first Korean restaurants in New York City. My parents even dined here back in their younger days. The reason I recommend Won-Jo and Soot Bul over other Korean BBQ restaurants is for one simple reason – hot coals. Won-Jo uses ambered stone coals while Soot Bul uses actual wood coals, which makes a significant difference in my book.

Continue reading…

A Warm Winter Salad: Freekeh, Chard and Butternut Squash Salad with Bacon and Roasted Pecans

While I’m freezing my butt off in upstate New York and learning to cut a French rack of lamb ribs, I thought it’d be nice to share a cozy winter recipe. And since I think I’ll be sharing a lot more meat recipes in the near future, here’s one for the vegetable lovers in the room.

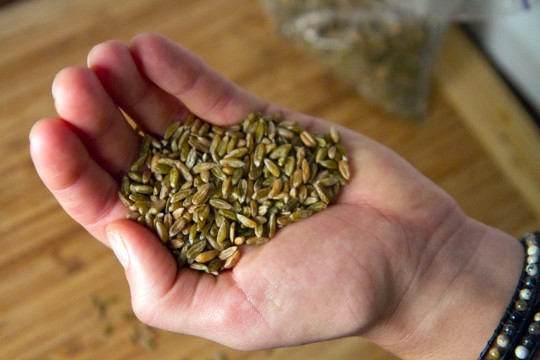
I made this last week with some Freekeh (pronounced “Freek-ah”) from Cayuga Pure Organics, a dried bean and grain vendor at our Grand Army Plaza greenmarket. Freekeh is a most awesome grain. It’s chewy and nutty and quite delicious, not to mention eating grains like this is good for you. Actually, here’s a better description from Cayuga:

Our Freekeh is roasted green spelt berries. It is also known as “Gruenkern” in Southern Germany, where it is a substantial part of the diet. The spelt is harvested when it is still young, wet and “green”. It is then slow roasted over coals in the hulls, and is then de-hulled resulting in a beautiful green spelt berry.

Last Winter I was making a simple salad of Freekeh with spinach and sautéed mushrooms. I’m sure I put goat cheese on it. But this time around I thought I’d put a weeknight twist on a favorite starter for cold weather dinner parties with roasted squash, bacon, pecans and bitter dandelion greens. It’s a recipe that I love from Sunday Suppers with Luques (a wonderful cookbook from Chez Panisse veteran, Suzanne Goin).

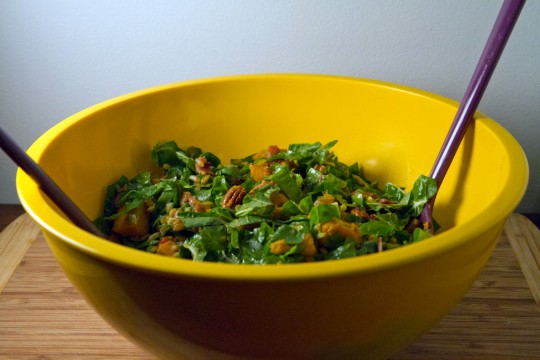
I added more greens, using Swiss Chard, and Freekeh to make a satisfyingly hearty winter salad with some warm elements. It hit the spot during a season when I’m not necessarily craving a plate of greens and was also great for lunch the next day.

Freekeh, Spinach and Butternut Squash Salad with Bacon and Roasted Pecans

serves 6-8

  • 1 cup Freekeh
  • 1 small winter squash, peeled and cut into 1″ pieces
  • 1 small bunch of Swiss Chard, stemmed and cut crosswise into 1″ strips
  • 1/2 cup roasted pecans
  • 6 oz. bacon, cut crosswise into 1/2″ pieces
  • 1/4 cup of minced shallots
  • 1+ tablespoon olive oil
  • 2 tablespoons sherry vinegar
  • Pecorino Romano cheese
  • salt and pepper

Preheat the oven to 375 degrees.

Cover the Freekeh by 1 inch in cold water. Bring to a boil then reduce to medium and simmer for 15-20 minutes until it’s tender but still a bit chewy. Drain and toss with 1 tablespoon olive oil, salt and pepper.

Meanwhile, toss the squash with a olive oil (be a bit generous), salt and pepper and roast, checking and turning once if they’re browning fast, for about 15-20 minutes. The squash should be tender to a fork, but not falling apart.

In a hot skillet, toast the pecans, shaking occasionally, until lightly browned and fragrant. Remove them to a large salad bowl. Add the squash to the bowl when cooked, then add spinach to the bowl.

Cook the bacon, over medium heat, until it’s just beginning to brown, about 5 minutes. You want it to still be chewy, not crisp. Remove it with a slotted spoon to a small bowl. Add the shallots to the bacon fat in the pan and cook, stirring occasionally until they’re golden and beginning to crisp, about 3 minutes. Add the sherry vinegar to the pan and quickly stir to deglaze (warning, it will sizzle and evaporate) and then add the vinegar and shallots to the reserved bacon. Toss the bacon and shallots with the spinach, squash and pecans gently until evenly mixed. Plate the salad and shave a few slivers of Pecorino Romano cheese over top before serving.

*I use a vegetable peeler to do this.

Pig to Pork Chop All in a Day

Yesterday I watched a pig be slaughtered. I also watched a side of pork be cut down to spare ribs and made into sausage. It was my first of five days at a butchery workshop with Fleisher’s Meats in Kingston, NY.

I can tell you that what I thought might be emotional and challenging was not so. I might even go so far as to say it was inspiring. After all, I am lucky enough to be the student of a master butcher for a few days and I have a lot to learn.

Today was my second day and I’ve quickly grown comfortable in the presence of animal carcasses. I broke down my first pig – of course I did this under the careful direction and guidance of my instructor, Hans, who I had to ask to show me the knot to tie a roast three times before I got it. It’s funny sometimes what is actually challenging in life.

More to come, but for now some photos.

Fair warning: Yes, these photos are a bit graphic and so I’m posting them as a thumbnail gallery (with apologies to anyone who finds them difficult to look at). Click to see the full size images if you’d like.

There is a length of twine in my pocket so I can practice my knots before I go to sleep tonight.

Kitchen Scraps: Split Pea Soup with Ham

Shortly after Thanksgiving while having dinner with my parents, I mentioned that I made turkey stock and soup with my leftover turkey carcass. Later that night after I returned home, my mom called to ask if I wanted them to save the ham bone from dinner for me to cook with. The next time I saw my dad it was for an arranged pet sitting swap. On a quiet side street just outside the Holland Tunnel, I gave him my dog Francine and he gave me a frozen ham bone.

Recently I spotted the ham bone in my freezer and tossed it into the refrigerator to thaw. I had yellow split peas on hand, so the following day that was the soup I was set on making. I looked at a few recipes, and considered what spices or other ingredients I might add for complexity, but ultimately I settled on a super simple, straightforward preparation that required just 3 ingredients and a few hours of simmering.

When Brad and I sat down to lunch with the split pea soup and some crusty bread, I had no regrets about my minimalist approach, it felt like I had made magic out of kitchen scraps. This split pea soup is incredibly delicious and satisfying. It will warm you up and fill your belly on a cold January day.

Yellow Split Pea Soup with Ham

  • 1 meaty leftover ham bone
  • 1 lb. yellow split peas, picked over and rinsed
  • 3 onions, minced
  • 2 quarts (8 cups) water
  • Salt
  • Fresh ground black pepper

Rinse peas and combine in a 6- to 8-quart heavy pot with water, ham bone and onions. Bring to a boil, skimming froth, then reduce heat and simmer until peas are tender but not falling apart, 1 to 1 1/2 hours. Season with salt and pepper and continue to simmer, partially covered, until peas are falling apart and soup is thickened, 1 to 1 1/2 hours (my soup cooked for about 2.5 hours total). Remove ham bone or ham hock, shred meat and return meat to soup. Taste and adjust seasoning if necessary.

Serving suggestion: Ladle the soup into bowls, drizzle with a bit of olive oil and serve with crusty bread.